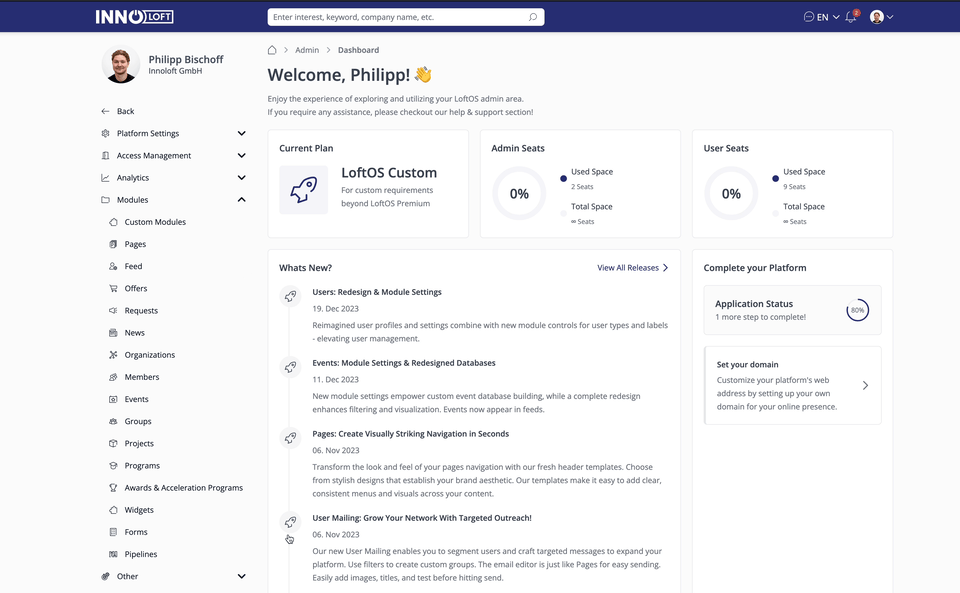
✍️ Custom Modules
Create your own “Custom Module” granting more flexibility in building a customized platform. The module creator allows you to build modules tailored to your needs with similar UX to existing modules like “Offers” and “Events”. Head over to Admin → Modules → Custom Modules and create the perfect modules for your users.
Using our extensive library of options to create:
🤝 Content Management (Admin)
Create a Custom Module
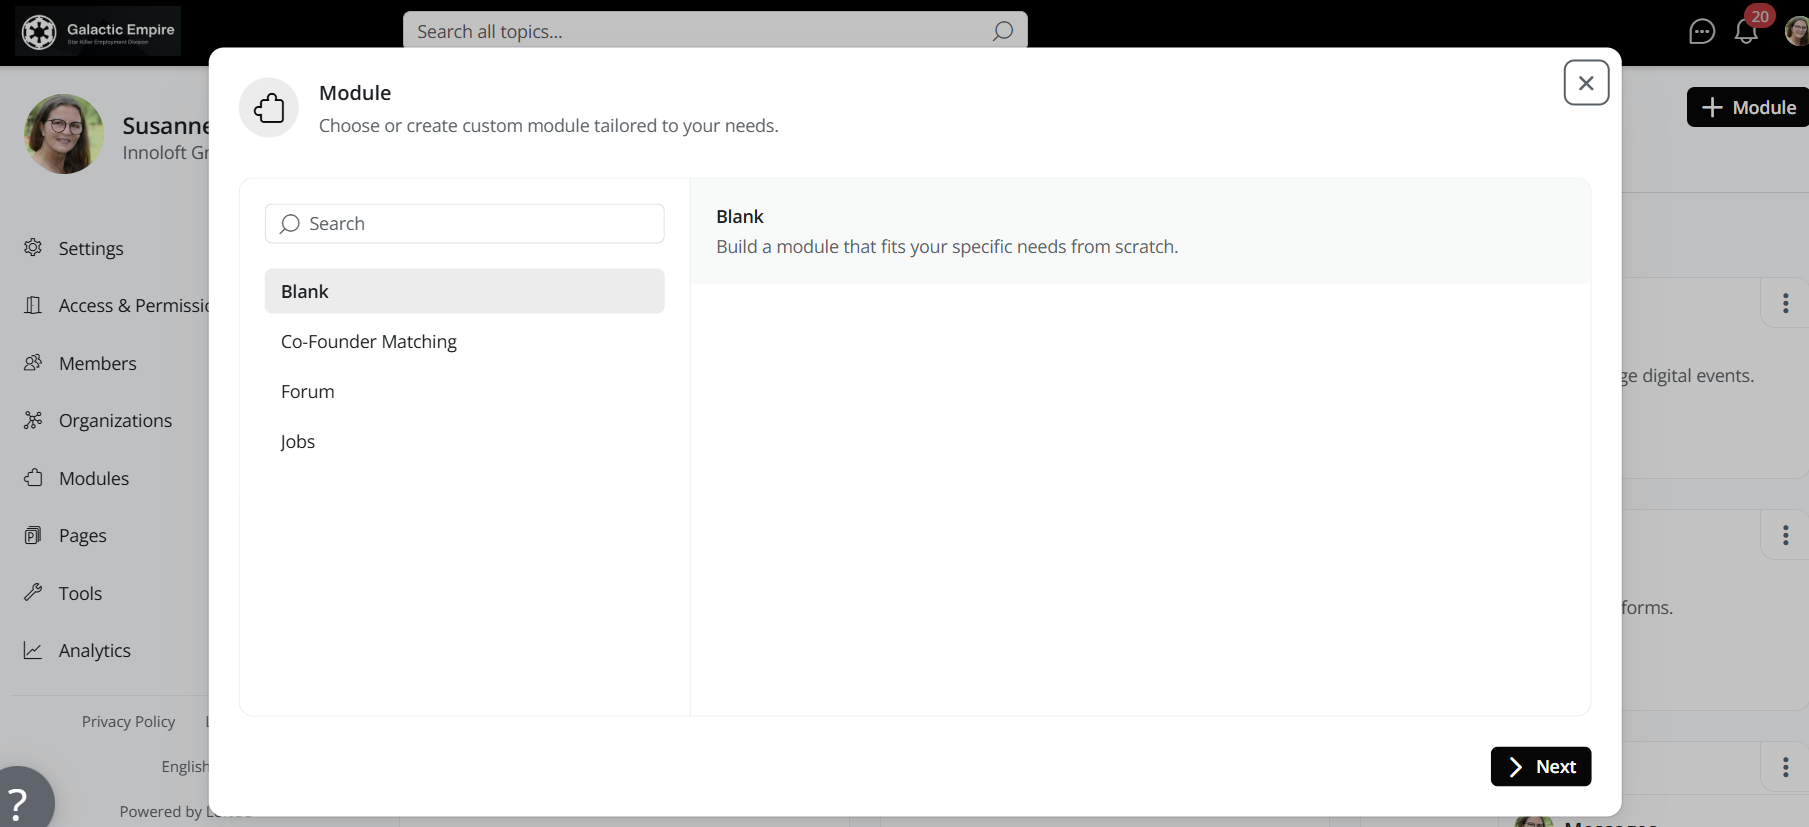
Based on your current package plan, create customized modules for your projects with ease. In the Admin area under Modules, open the “Custom Module” section, click “+ Module”. Choose either a blank template or a pre-configured, ready-to-use template designed for various use cases.
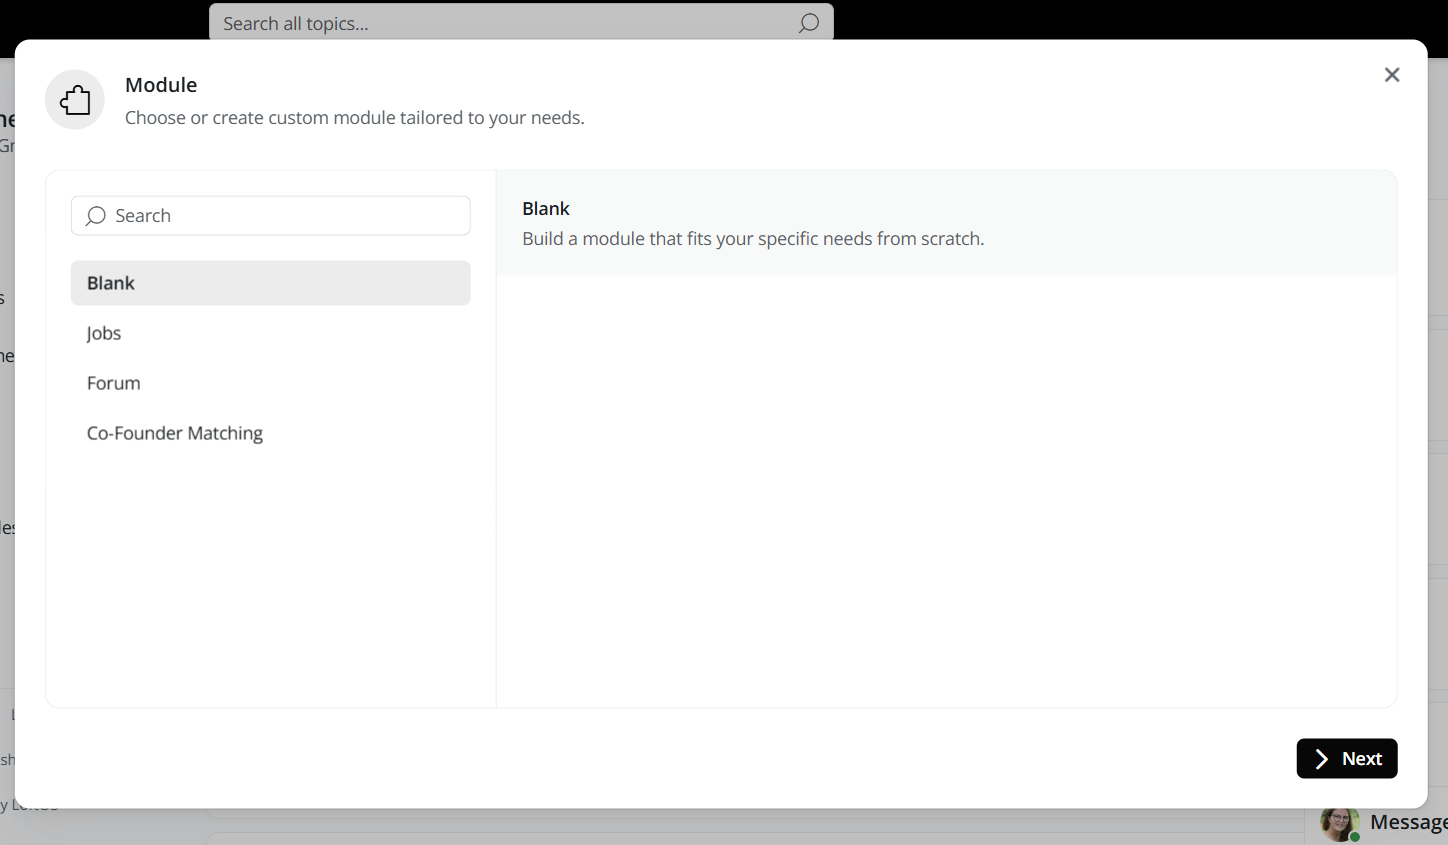
If you select the blank template, enter the details for your new module. Choose a name, provide a description, upload images, and select icons from our library. Go to Advanced Settings to choose a color for your module. Use the toggle if you want to display your module in the feed and enable group connections if needed. Save your settings.
When you choose a pre-configured template, simply follow the guided steps. Once completed, proceed with the next actions as outlined below.
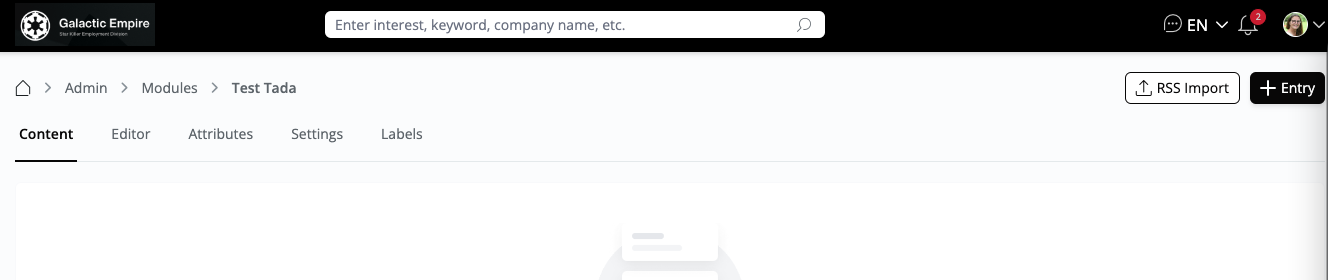
Select the Module you just created from the Modules overview.
Edit a Custom Module
Delete a Custom Module
Group modules into a database
Head over to Views to see how you can group custom modules into one database.
Give access to your users to the module
To give access to your users to allow them to add content, link the module in your navigation bar:
Add a Link to connect your modules with external pages
Go to Admin - Custom Modules - Attributes ”+Attributes” select “Link”.
Add RSS feed
Head over to Admin - Custom Modules - Content ”+ RSS Import”.
To show images for your entries, make sure that your RSS feed has the images in one of the following structures:
1.
2.
3. CDATA description with HTML tag
Example:
Example News Feed
https://example.com/
Latest news updates
-
News with Enclosure Image
https://example.com/news/3
This is the news description for item 3.
-
News with Media Content Image
https://example.com/news/2
This is the news description for item 2.
-
News with Image in Description
https://example.com/news/1
This is the news description for item 1.
]]>
Link platform content from different modules
Add a section “platform content” to link organizations, users, or data from other custom modules within your module entry. Create portfolios of the organizations you are connected with, your projects and awards, or companies you want to mention as a reference for example.
Import data to your Custom Module
Head over to Content and click “+Entry” in the top right corner. Select “Import Data” from the drop-down. Follow the steps to name your file and download the file. For example, a use case would be if you want to import your blog posts.
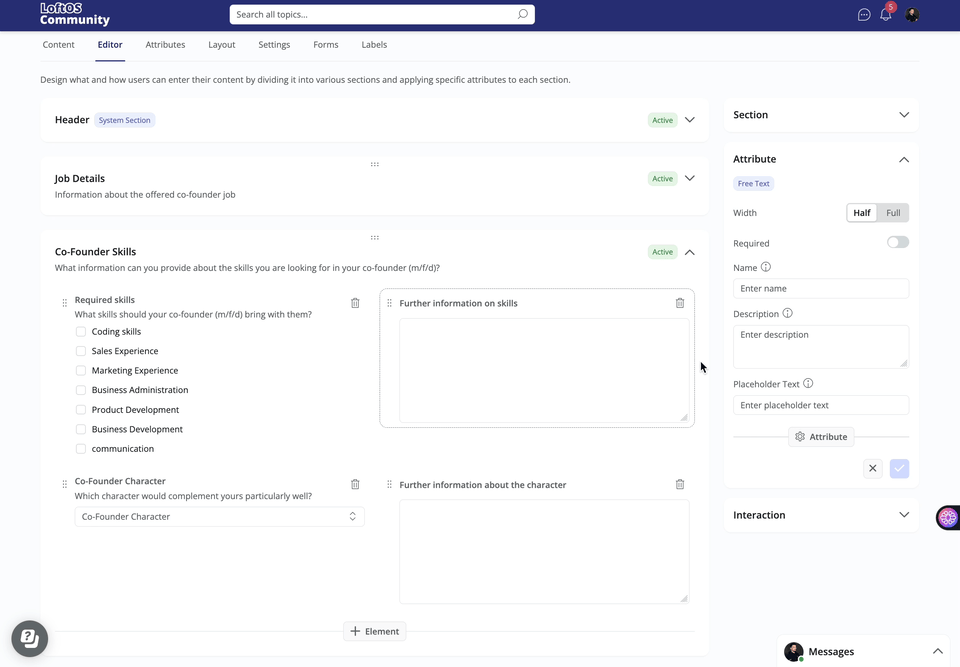
Add Attributes to your Sections
Go to Content → Editor, click “+Section”, select “+Attribute”, and create your Attribute from the extensive Attribute Library. Select from 'Base Attributes,' which are the familiar options, or access 'My Attributes' to add your favorite attributes.
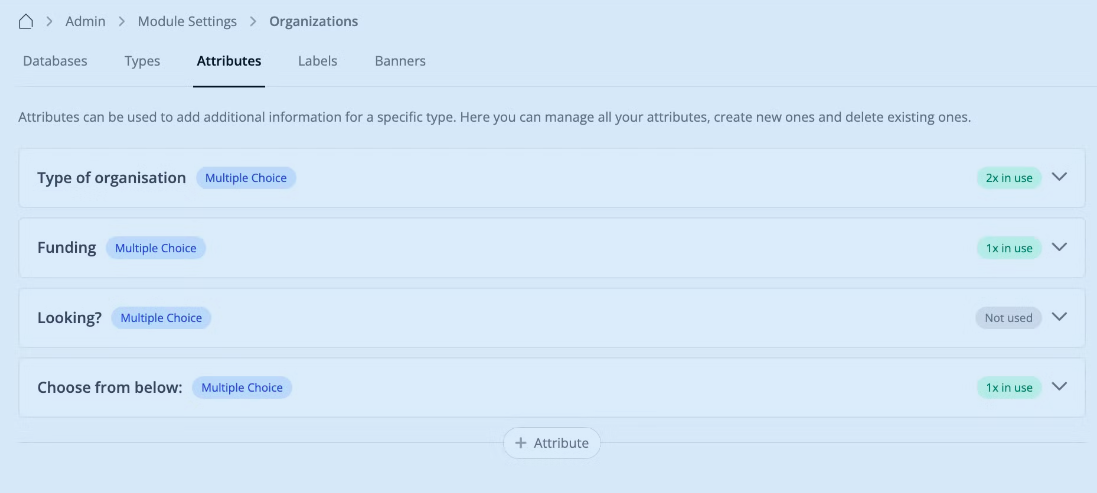
There is no need to create Attributes twice or three times. Custom Modules, Members, Organizations - they all share the same Attribute pool. Create an Attribute once, and use it everywhere.
Look for the green "1 x in use" label (or more!) next to the Attributes of your choice. Click to see where else it's being used.
Let’s create a new Attribute and use it in the Section we created above. To create a new Attribute:
Once saved, your section is ready to be displayed. You can also adjust the order of this section by simply dragging and dropping it into your desired position.
Attributes can be created not only from within sections but also via the "Attributes" tab in the Organizations module settings. From there, you can view existing attributes and see how many times they have been used or are currently in use across the platform.
Address Attribute
Pinpoint Locations with precision
Navigate to Modules → Custom Modules → Editor, click "Add Attribute," and select "Address" from the Base list Attributes. Select from the Key Features below.
Key Features:
Tree Attribute
Explore the power of hierarchical data organization with the Tree Attribute. Visit the Attribute Library in your Custom Modules and start building your custom trees.
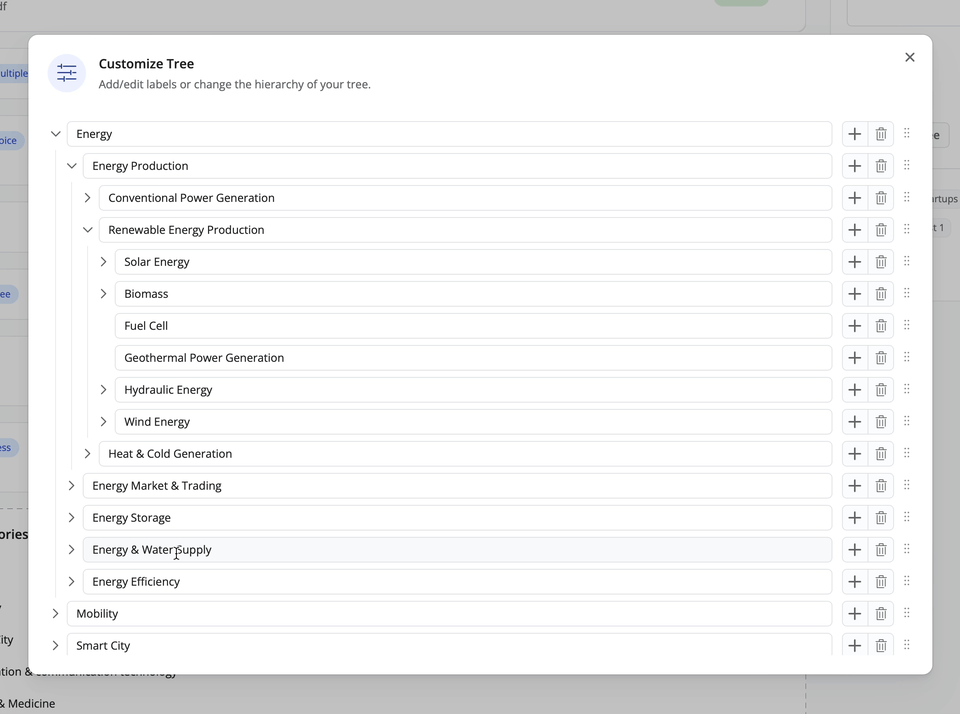
Tree Attribute Categories and Customization
Create a custom tree:
Preconfigured Templates
We’ve introduced preconfigured templates such as the LoftOS Category Tree, which provides a predefined set of categories you can use directly. If you don’t need all the predefined categories, you can easily modify or remove them to suit your requirements.
Date Attribute
A flexible date input field that enables users to choose specific dates, date ranges, months, or years, ideal for gathering any date-related information. This can be used, for example, for idea competitions, funding applications, or job boards. You can use the date restriction for your database to show only valid entries.
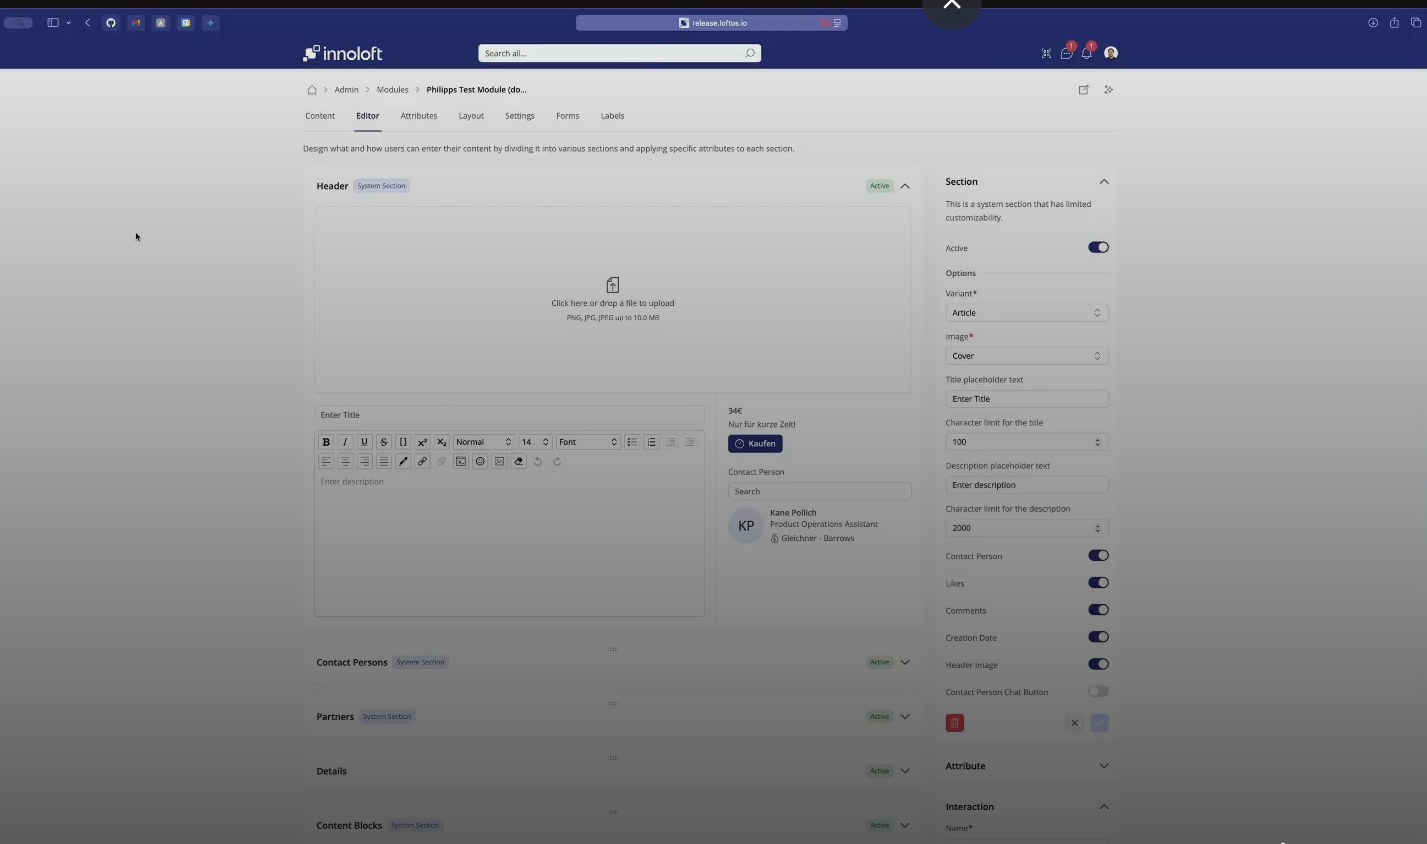
Hide Header Image
Head over to Content → Editor and select “Header Image” from the right-hand side section panel. Include the Alt text and image source.
Keyword filters at your command
You can toggle keyword filters on or off in database views for your Custom Modules. Take control of how users find content, making navigation simpler and more intuitive. Configure in Module Settings →View Options → Keyword Filter toggle on or off.
Allow Restriction by Creation Date
Enable time-based restrictions directly in the Module Settings to keep data fresh and relevant—no manual cleanup required.
Show entries created or updated within a specific timeframe (e.g., last 6 months).
Ensure users interact with accurate, up-to-date content.
Outdated entries are automatically hidden, keeping your module organized and efficient.
How to enable time-based filtering:
In Custom Modules go to Settings → select Restrictions → set your desired time frame.
🆕 Latest updates - How to
Customize your Database Cards
Take full control over how entity cards appear in the database view. Whether you’re adding attributes, adjusting sections, or creating a custom layout, the Card Editor makes it simple and intuitive to design cards that perfectly suit your workflow.
Add and Change Attributes: Effortlessly add, remove, or update the attributes displayed on your database cards in the module overview. Highlight key details for your users at a glance.
Full Customization: Combine or split sections on the card to match your specific needs. Design a card structure that works best for your team’s unique workflow. For example, show text over your image.
To customize your entity cards:
Note: you can only add the following elements:
Customize your Header Section
Customize your header section and choose between two variants, Article or Marketplace.
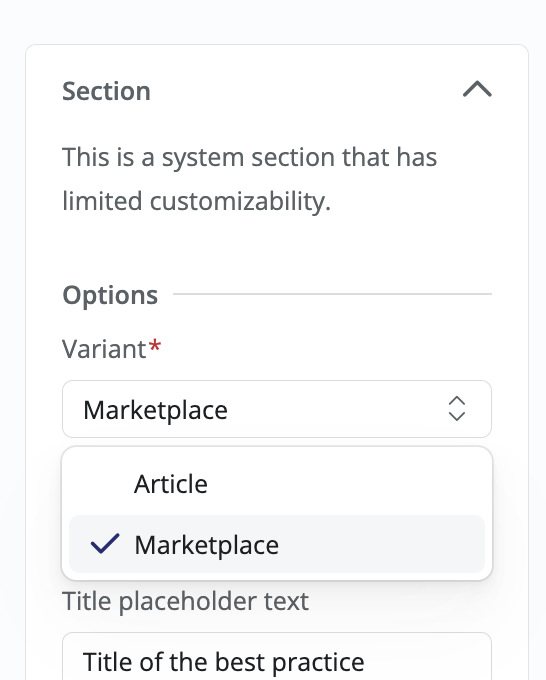
When to use the Marketplace style:
1. Product showcases: Present your offerings with a clean, catalog-like appearance that highlights both visuals and key details.
2. Expert directories: Create professional listings where profile photos appear alongside credentials and expertise areas.
3. Resource libraries: Display documents, videos, or tools with thumbnails and descriptions in an easily browsable format.
Enhanced Interactions & Form Management
Key Features
Add forms or links to custom modules, allowing users multiple ways to engage with the content.
How to Get Started
How to Set Up
Connect Form Applications to Pipeline for a Seamless Assessment Process
Optimize your application assessment with the Pipeline Integration feature. Form applications from Custom Modules can be directly linked to the Pipeline module, making it easier to track, evaluate, and manage submissions within your workflow.
Key Features
How to Get Started
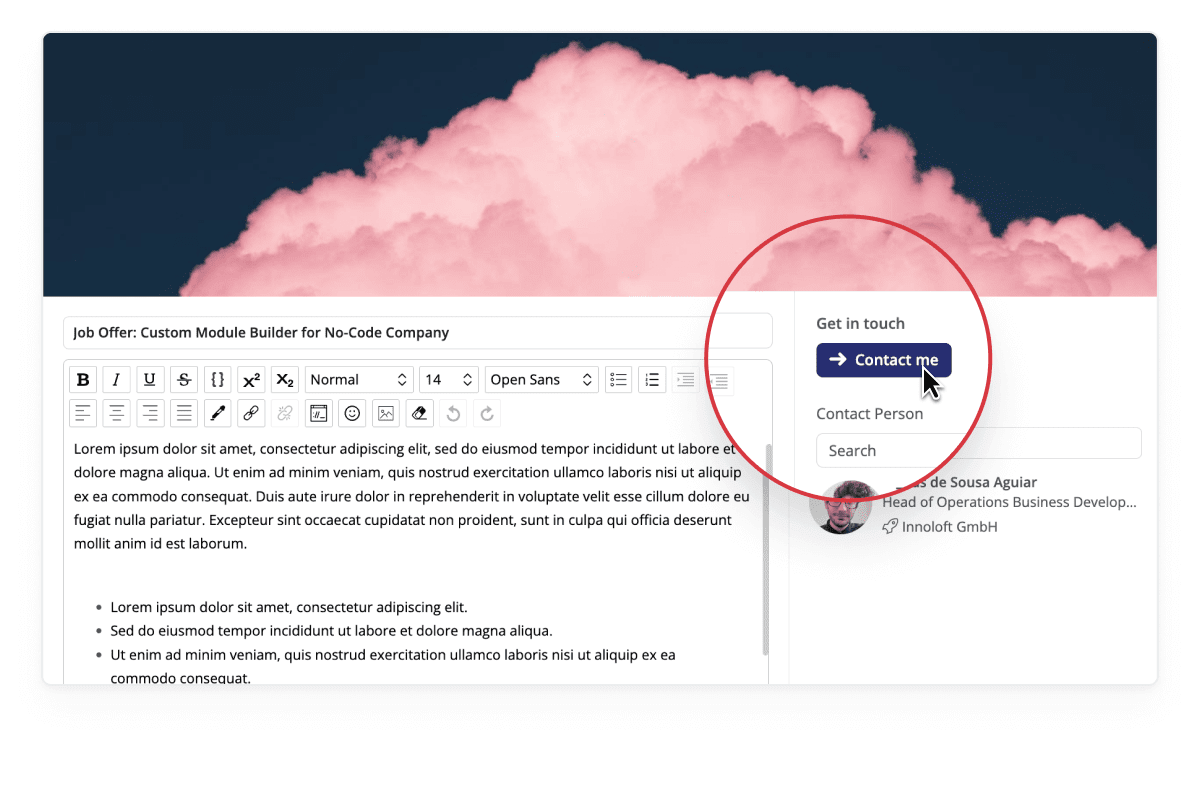
Add a button to simplify actions in your Custom Modules
Add a single button for job applications, form submissions, or feedback—without redirecting users to separate pages.
Instead of using external forms or links, users can submit applications, requests, or ideas right where they engage with your content. If it’s an external link, they’ll be directed to another page. If it’s a form, every submission flows into Pipelines, making it easy to track applications, requests, or any data-driven process.
Flexible Placement & Use Cases
You decide where to place the button—whether in the module header (e.g., a “Contact Me” button) or within a section (e.g., “Apply for this job”). This is ideal for:

How to set up
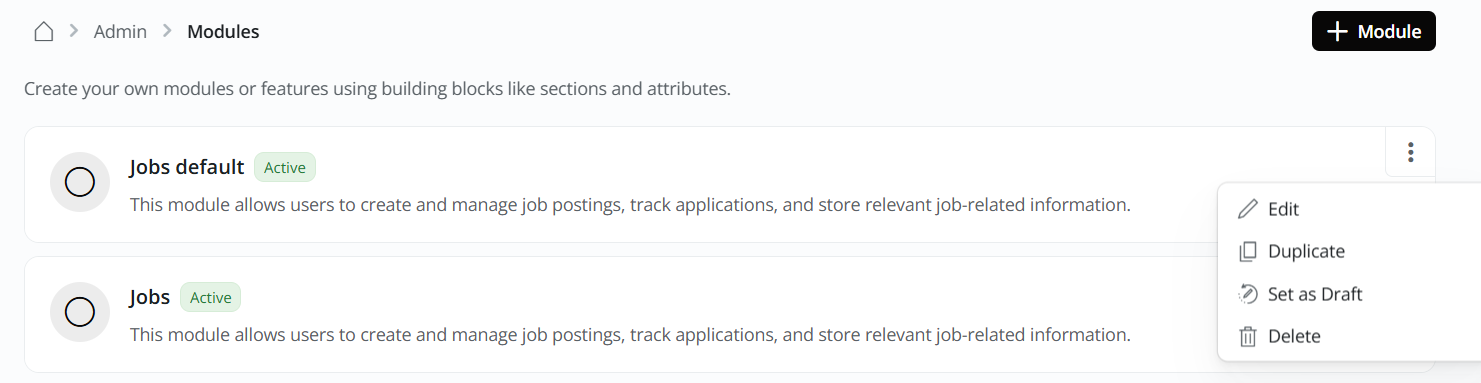
How to Duplicate a Module
To duplicate a module, follow these steps:
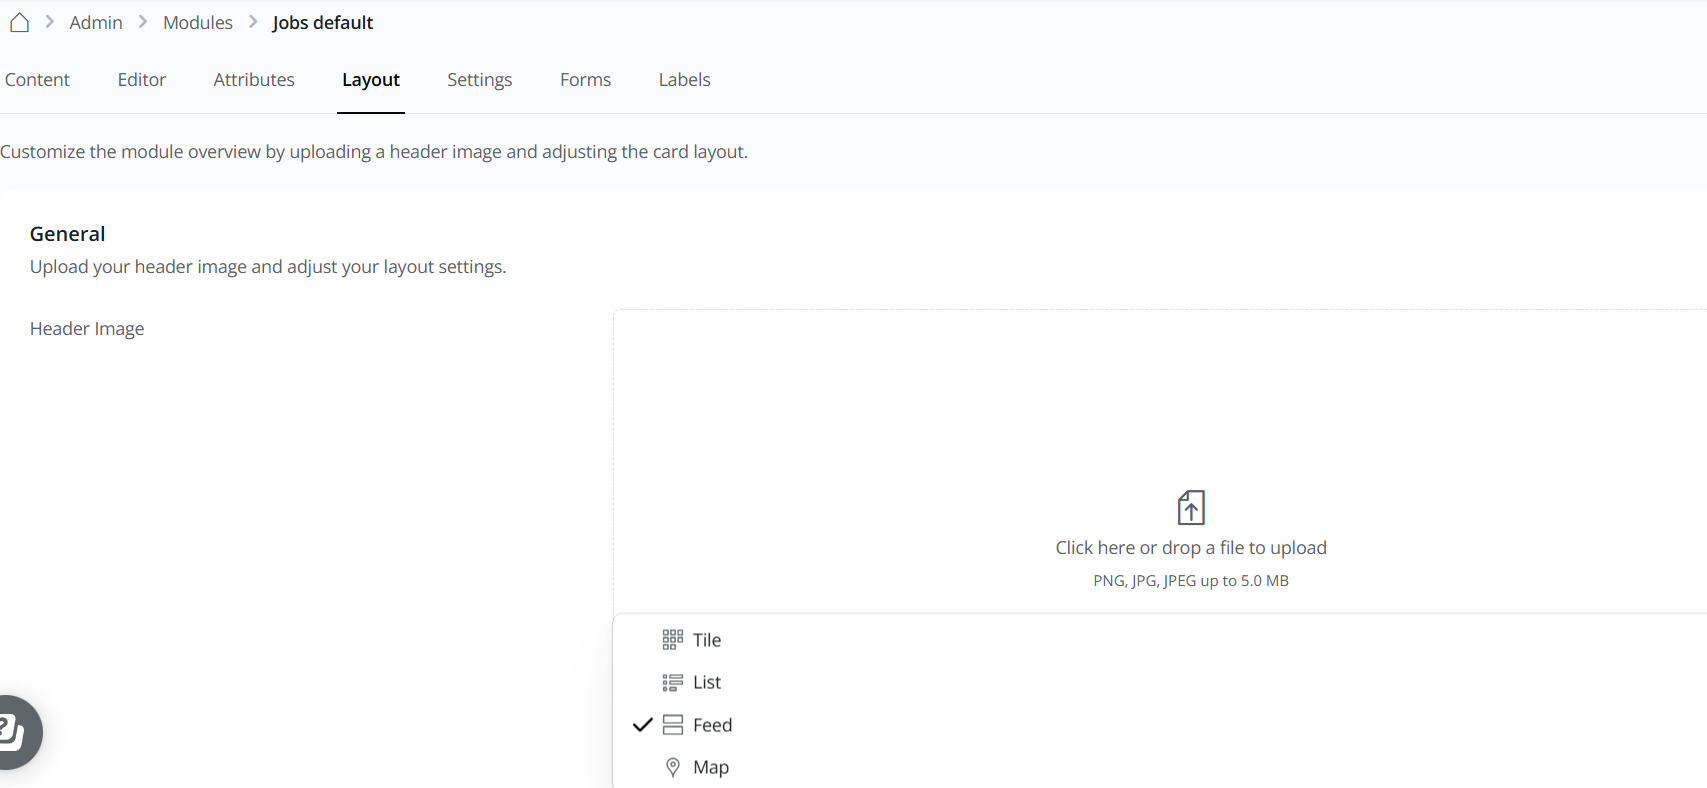
Match your Module to the Feed Style
To display your module in the same style as the Feed:
Your module will now be shown in the same visual style as the feed.
Implement the Module Template Library
Creating a New Module by implementing from the Template Library
Customize the title and description of attributes per module
(without changing how it's used in other modules. This allows for more precise and contextual customization)
How to Override Attribute Settings per Module:
Log in with admin rights and navigate to Modules.
Select the specific Module where you'd like to customize an attribute.
Scroll to Section on the right side where attributes are listed.
Click on the Attribute that you wish to adjust for this Module.
You’ll now see fields for:
Change the attribute to fit your purpose.
💡 Key Benefits
Add an Interaction Deadline as System Attribute in the Card Editor
This allows you to assign time-sensitive actions (like filling out a form or accessing a link) and automatically highlight cards as the deadline approaches.
1. Log in as Admin
2. Go to Modules
3. Select the Target Module
Choose the specific module where you want to add the interaction deadline (e.g., Projects, Events, Applications).
4. Open the Layout Editor
Click Layout in the top bar to enter the module's layout and card configuration view.
5. Go to "Interaction Deadlines"
This feature allows you to:
6. Configure Styling Options
Choose how the card should appear as the deadline approaches. Activate the option to highlight the card as the deadline gets closer, marking approaching or due dates.
7. Save Changes
Custom Modules – Set Header Attribute per Module
Overwrite an attribute’s name, description, and placeholder text per module—without affecting its use in other contexts. This gives you greater flexibility when tailoring modules to specific use cases.
What You Can Do
Adjust an attribute in a section separately for each module.
Use the same attribute in multiple modules, each with unique names.
Present attributes in a way that makes sense for the context and better guides your users.
Step-by-Step: How to Set Header Attribute per Module
Step 1: Login as Admin
Step 2: Go to your Custom Module Settings
Navigate to the area where Custom Modules are managed.
Step 3: Select a Module and open the Editor Section from the top bar
Step 4: Select the Section to overwrite the Attribute
Find the specific attribute you want to override and select it.
Step 4: Customize the Attribute for this Module by creating a new Attribute from the right side Section
Step 5: Save Changes

How to Receive Notifications for New Entries in a Custom Module
Stay up to date with the latest content by subscribing to notifications for custom modules. This feature ensures you’re instantly informed whenever new entries are added—without needing to check manually.
Step-by-Step Guide:
Open the platform and go to the specific custom module you’re interested in.
In the top section of the module, find and click on the notification bell icon.
Clicking on the bell activates notifications. You’ll now receive an alert whenever new entries are published in this module.
You can view or adjust your notification preferences at any time in your user settings or directly within the module.
What You Get:
How to Add a Contact Person to Your Custom Module
Make your module more interactive by adding a contact person users can reach out to directly. Follow the steps below to enable this feature.
Step-by-Step Guide:
Navigate to an existing custom module or create a new one.
Use the top navigation bar and click on the Editor.
Toggle the button to display the contact person section in your module. This enables users to see and, if configured, chat with the assigned contact person.
How to Set Module Restrictions by Organizations
Follow these steps to restrict access to specific modules based on organization type or name:
Choose the module you want to apply restrictions to.
Use the top navigation bar and click on Settings.
In the settings menu, scroll down until you find the Restrictions section.
Decide how you want to restrict access:
Click the dropdown under Organization Type and choose the appropriate type(s) that should be restricted.
Enter the specific organization name(s) in the provided field to set name-based restrictions.
How to Set Up Synced Chats in Groups or Programs
Use this feature to automatically sync chat communication for a specific user group or selected members within a Group or Program.
Choose either the Group or Program module where you want to manage synced chats.
Click on Settings for the selected Group or Program.
Locate the specific chat or space you want to sync members to.
Click on the member selection dropdown to define who should be synced.
Use Case
This feature allows you to ensure that communication within a Group or Program includes only relevant participants. For example, you can:
❓ FAQs Admin
How do I choose a module name when creating a new module?
You can choose a module name during the creation process. Simply enter the desired name for your module.
What are some suggestions for a module name related to research results?
Consider naming your module a relevant term, such as "Research Results" to reflect its purpose.
What information can I include when entering descriptions in the module?
You can include descriptions, images, and more in the module. The rich text editor allows you to input various content.
How do I select views for my module, and what views are available?
You can choose views like card view or list view for your module.
Can I customize the icons for my module?
Yes, you can select icons for your module from our vast library.
What happens after saving the module creation?
After saving, you will see the newly created module under “Custom Modules” in your admin area. Initially, it will have no content, but you can start creating sections using the editor.
How do I create sections within my module?
In the editor, click “+Section” to create new sections. For example, you might start with a section named "Basic Information."
Can you provide an example of a section for research results?
For research results, you might create a section like "Type of Research Result" and explore various types within that section.
How do I add attributes to my module?
To add attributes, go to the editor, and within a section, you can create attributes. For example, you might add attributes like "Material Value" and "Technology Readiness Level (TRL)."
Can I customize the display of attributes?
You can customize the display of attributes. For example, you can set attributes like "Type of Research Result" to be displayed.
How do I navigate back to the editor to add more attributes?
You can go back to the editor from the settings and add more attributes or sections.
How do I add entries to my database?
By clicking on your newly created module, such as "Research Results," you can add entries. For example, you might add entries with details like material values and TRL.
Can I customize the view of my entries, such as having a list view only?
You can customize the view of your entries. In the settings, you can choose between views like list view or card view.
How do I hide the contact person in my module?
To hide the contact person, you can click on the switch in the detailed view.
How will custom modules integrate into the overall platform structure?
Custom modules will be similar to standard modules found throughout the platform. They can be part of packages, added to navigation settings, and customized for different use cases. Integration to packages and increased flexibility enhance their functionality.
Can I add the custom module to the navigation for easy access?
You can integrate custom modules into the navigation. By going to navigation settings, you can create a new entry and add custom modules, such as the recently built "Research Results," for easy access.
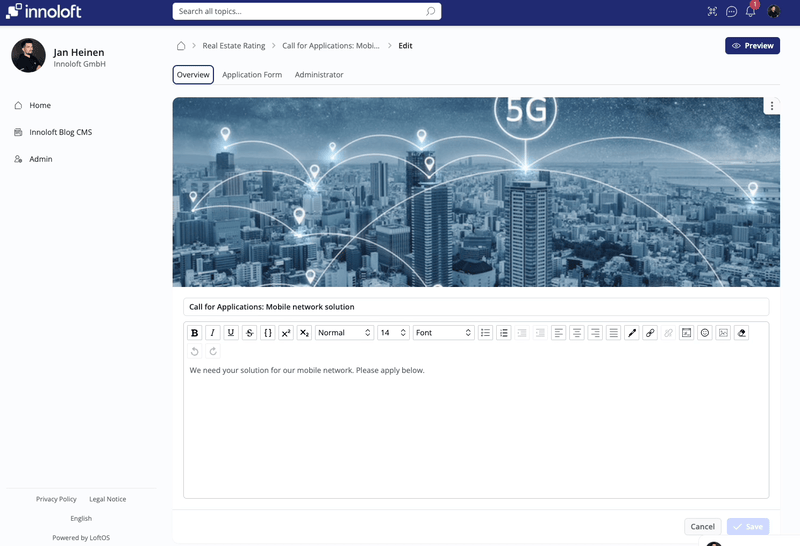
How do I create my first entry in a module?
To create your first entry, navigate to the "Module" section. Click on "+Entry" to begin. Choose a suitable image and input your description content using our rich text editor. Save your settings.
How do I change the contact person for a specific task or inquiry?
To change the contact person, select "Change" under the Contact Person section. Start typing the name of the desired contact person and choose from the options provided.
Where does a video need to be stored or from where does it need to be uploaded to be played in Content Blocks?
Store or upload your video from YouTube, Vimeo, Dailymotion, Twitch, Soundcloud or Facebook videos.
Can I use Custom Modules together with Pipelines?
You can use Custom Modules and Pipelines together by creating content in your Custom Module and then adding it to a Pipeline. In the Pipelines settings, enable the toggle in General Settings for “Allow content from other modules to be added to own pipelines.” Make sure that the pipeline has at least 1 column. Then, select from any entry from the Navigation bar. Click on the ellipsis and choose “Add to Pipeline” from the dropdown menu.
Please note that the content from the Custom Module will appear as a Card within the Pipeline, allowing you to engage with it through comments and Evaluations using the Pipeline's features.
Troubleshooting Missing Entries in the Costume Module
If entries are not appearing in the Costume Module, follow these steps to identify and resolve the issue:
Ensure the person who created the entries has a role with sufficient writing rights in the module.
Review the module's settings for any active restrictions.
What is the ideal aspect ratio/format for a header image?
Header images for a custom module should ideally have a aspect ratio of 16:5 or a resolution of 2250px x 700px.